HomeLabbing: A week of Sys admin roleplaying
My Holiday Project
I was inspired to setup my own HomeLab after going down a rabbit-hole of homelabbing videos and being amazed at the possibilities of what could be done. You could essentially replace any external monthly subscription service with a self-hosted alternative. Whether it was movie streaming (Netflix), music streaming (Spotify), smart home automation (Alexa), or cloud storage (iCloud), there was an open-source self-hosted option for it.
Most importantly, I thought this project would be a fun hands-on way to learn more about networking and sysadmin skills.
The tenets I set for this project was to use free and open-source software because: (1) I’m cheap, (2) I didn’t want to rely on any external services (for many reasons including avoiding monthly subscription fees), and (3) I generally support the open-source movement.
First, I needed a problem to solve. One inconvenience that my parents had was having to manually turn the lights to the front door on and off every day. Somedays, they would forget to turn them off in the morning and end up leaving the lights on all day. When they go on vacation, they just leave the lights on 24/7. The idea of a self hosted smart home automation flashed in my head. So I brought the idea to my parents and found that they were also looking to install a video doorbell. So that was it, I found my problem. I set out to install smart light switches and a video doorbell and have them integrated into Home Assistant, an open-source self-hosted smart home automation platform.
Hardware
Luckily my parents hoard all of our devices that we’ve ever owned, so while I was visiting my parents over the holidays, I decided to revive a 10 year old Dell laptop collecting dust in a closet and purpose it for my home server. A couple things to mention for using a laptop as a server: I removed the battery to prevent it from being a fire hazard, I configured the screen to turn off after 30s of inactivity (guide), and I set it to stay on even with the laptop lid is closed (guide).
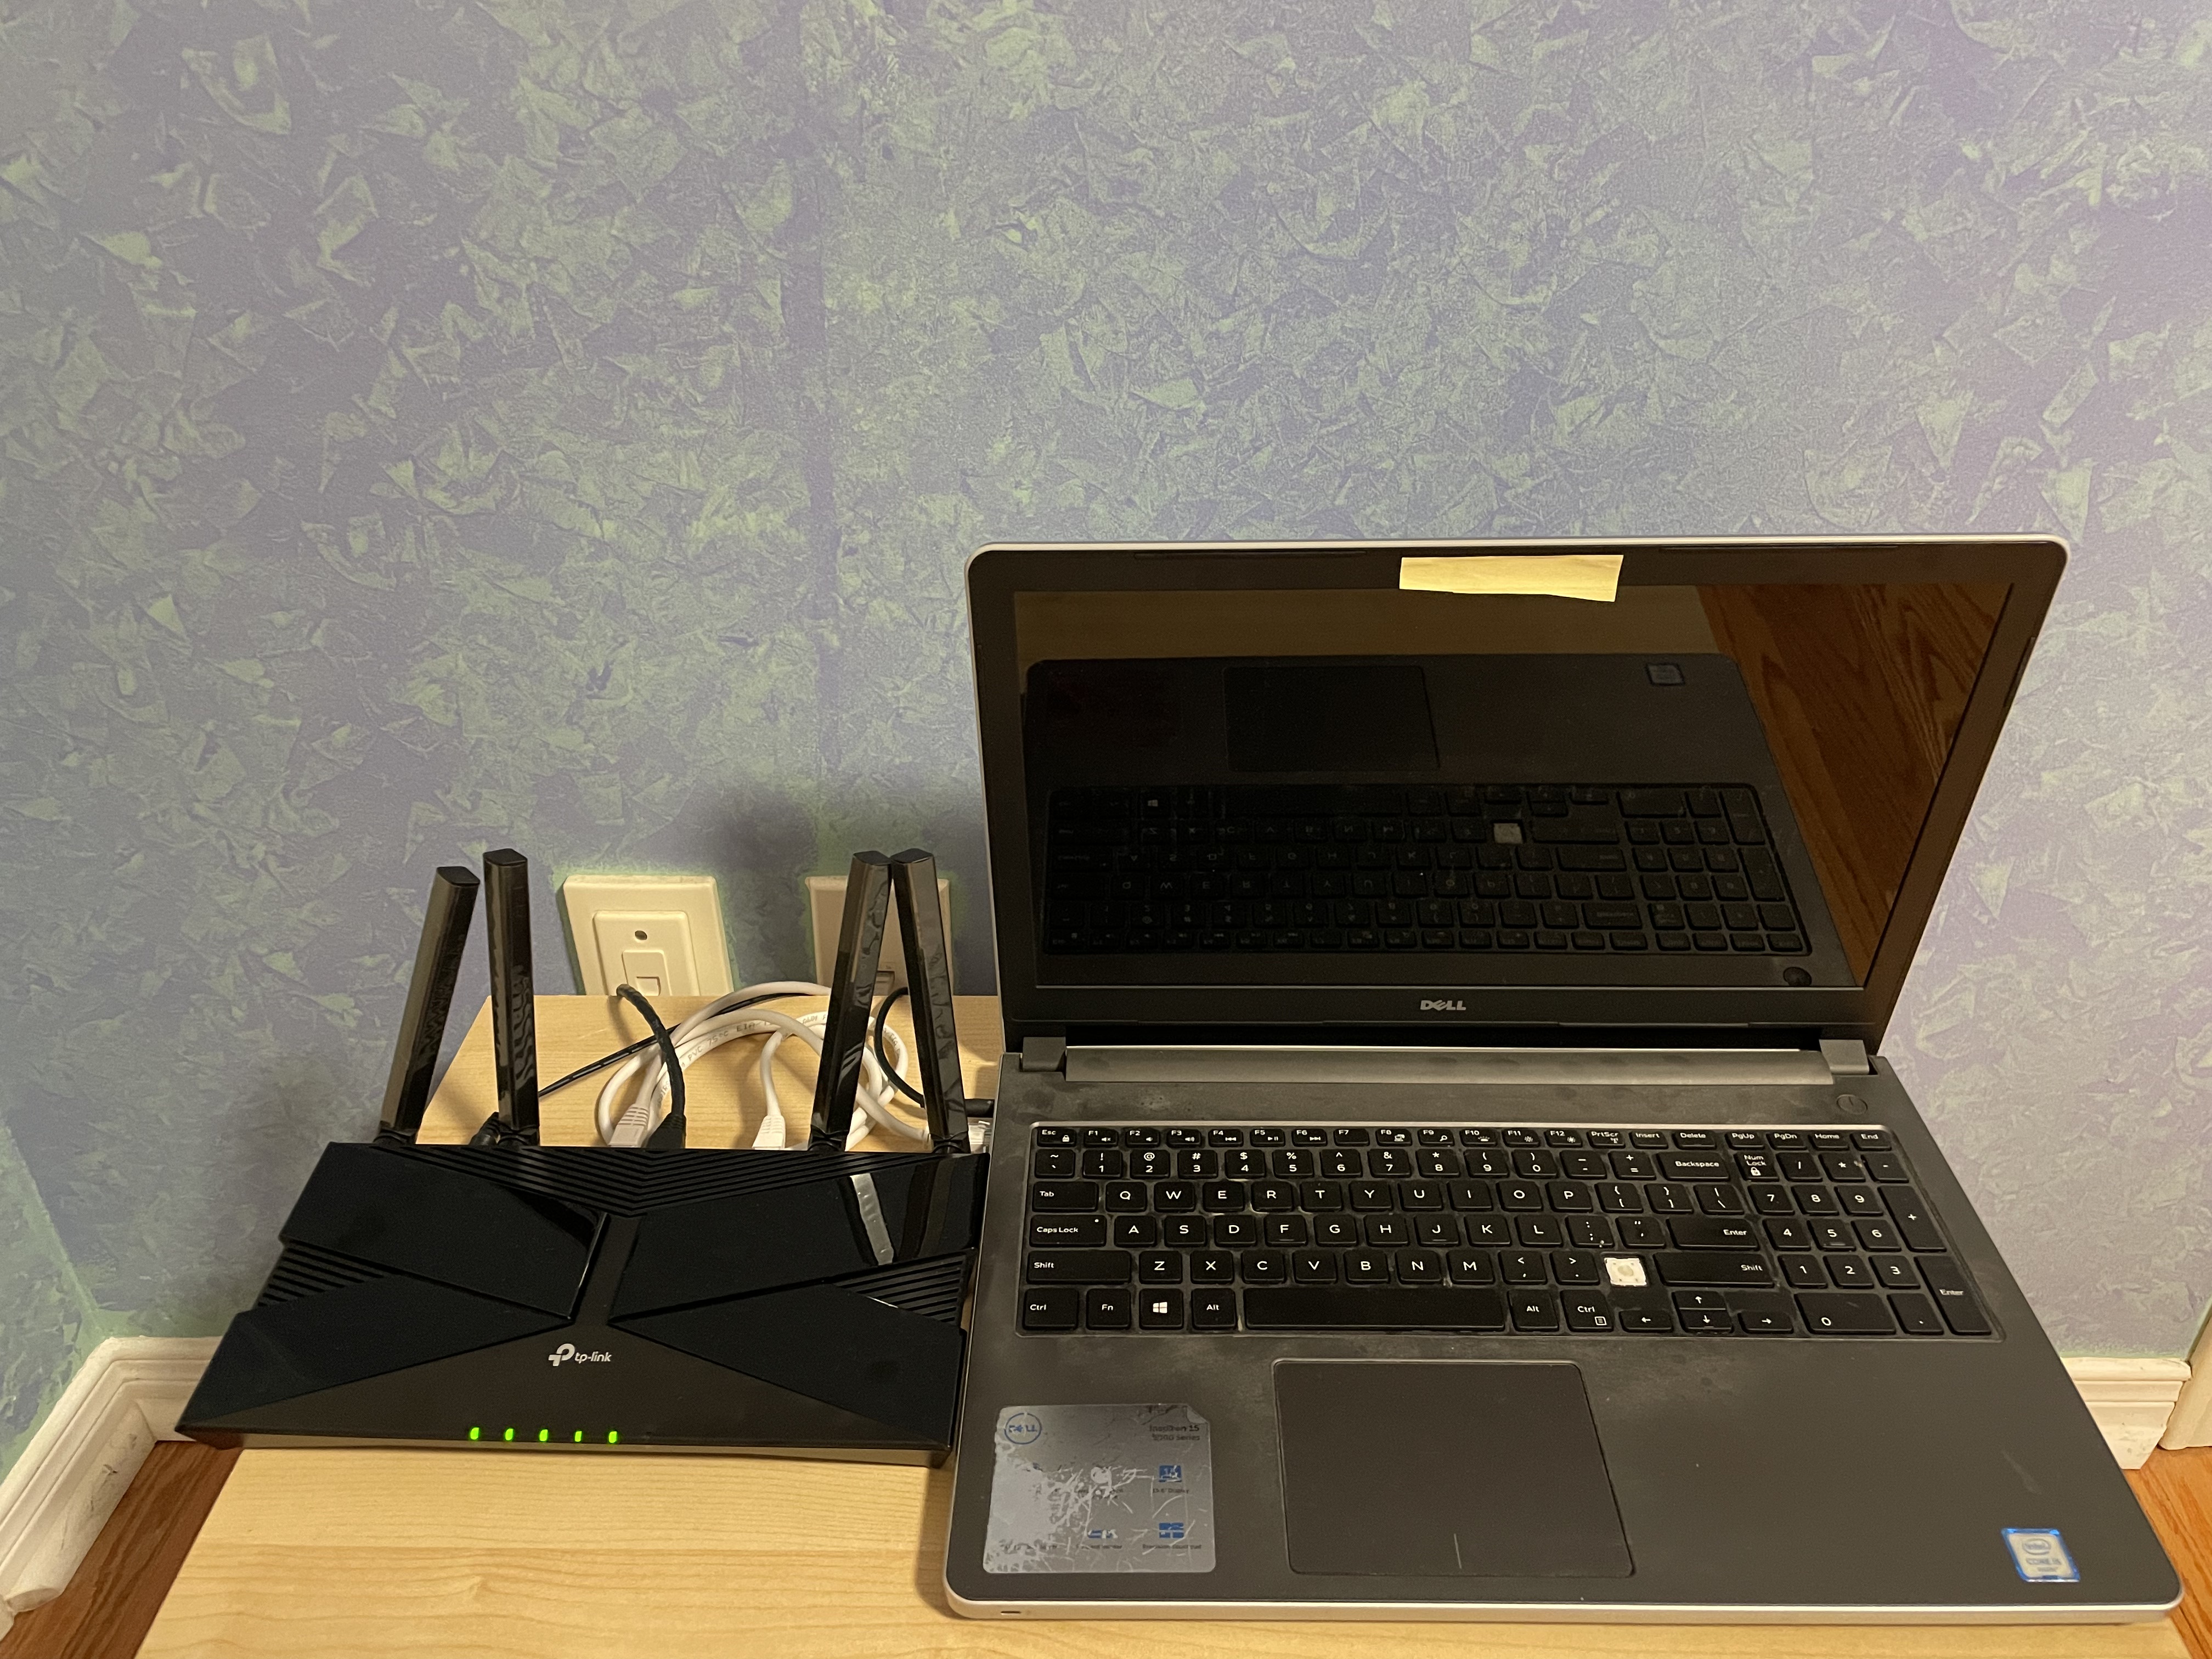
I went with the Kasa HS200 smart Wi-Fi light switches. While I was researching light switches, I found out that there are low-power mesh networking protocols like Zigbee and Z-Wave for IoT devices and while I was tempted, I settled on a Wi-Fi connected device as that was going to be the simplest option to get installed and it would work just fine for this simple project.
For the doorbell I purchased the Reolink Video Doorbell Camera WiFi. There are many other video doorbell options out there but most of them will essentially lock you into their own proprietary cloud service in which they lock important features behind a monthly subscription fee. This Reolink doorbell gives you full access to its features and it has a supported integration with Home Assistant.
Home Server
The laptop took over 10 minutes to boot into Windows 10 after powering it on so after I made sure there was no important data to be saved, I wiped it and booted Debian. I initially considered ProxMox but I figured I didn’t need the extra features for what I was setting out to do.
In the end, I settled on 4 services that I wanted to run on my server:
- VPN
- Home Assistant
- DNS
- Reverse Proxy
In order to deploy these services on my server, I used Docker.
VPN
Setting up a VPN would provide remote access to my server which is an essential feature for accessing Home Assistant on-the-go or for SSH-ing into the server while I was away from my parents house.
To setup a VPN I first needed to verify that my ISP did not employ CGNAT for my network. CGNAT is a method that addresses the shortage of IPv4 addresses but it works by sharing an IPv4 address between multiple households which tends to block incoming connections and port forwarding. To verify I wasn’t behind CGNAT, I ran a traceroute on my public IPv4 address (found through https://whatismyipaddress.com/) and verified that there were no additional hops after my local router hop. While I did confirm that I was not under CGNAT, I discovered that my parents had somehow configured triple NAT by having router --> router --> modem. After taking a look, I found that this was unnecessary and removed the intermediate router so the end result was router --> modem. The modem was in the basement while the router provided faster connectivity upstairs.
Since my ISP didn’t have a static public IPv4 address, I needed a dynamic-DNS (DDNS) to have a constant domain name that would map to my changing IP address. There are free DDNS providers out there such as Duck DNS but TP-Link router offered a free DDNS service which was very simple to setup so that’s what I went with.
My router has a built-in OpenVPN server feature but after testing it out, I couldn’t even enable the “Preferred” security level on my OpenVPN client so I chose to self-host a WireGuard server with wg-easy. Once I had started the wg-easy Docker container, I was able to establish a tunneled connection but I did not have any internet connectivity while on my VPN connection. After a night of troubleshooting, I found a GitHub issue (#2208) that matched my problem and the solution was to explicitly specify the interface names for the wireguard and reverse proxy Docker networks. Although the solution is provided in the issue, the root cause of the problem wasn’t apparent. So out of curiousity I investigated the networking issue deeper and tracked down the cause to be a MASQUERADE rule in the POSTROUTING chain that would be incorrectly configured on the reverse proxy network interface instead of the wireguard network interface when the network interface names were not explicitly specified (in-depth details can be found in my comment). With the WireGuard VPN working, I now had remote access to my home server.
Reverse Proxy & Local DNS
A reverse proxy and a local DNS server would work hand-in-hand to provide communication with my services through HTTPS and human-friendly domain names to access my services rather than IP address, port combinations.
I’m using Caddy for the reverse proxy. In order to setup HTTPS, I generated my own root CA certificates with OpenSSL and then signed a wild card certificate for my server’s domain name. I also configured sub-domains for each service in the Caddyfile that would route to the ports that the services were listening on. For example, Home Assistant could be accessed with ha.homeserver.com.
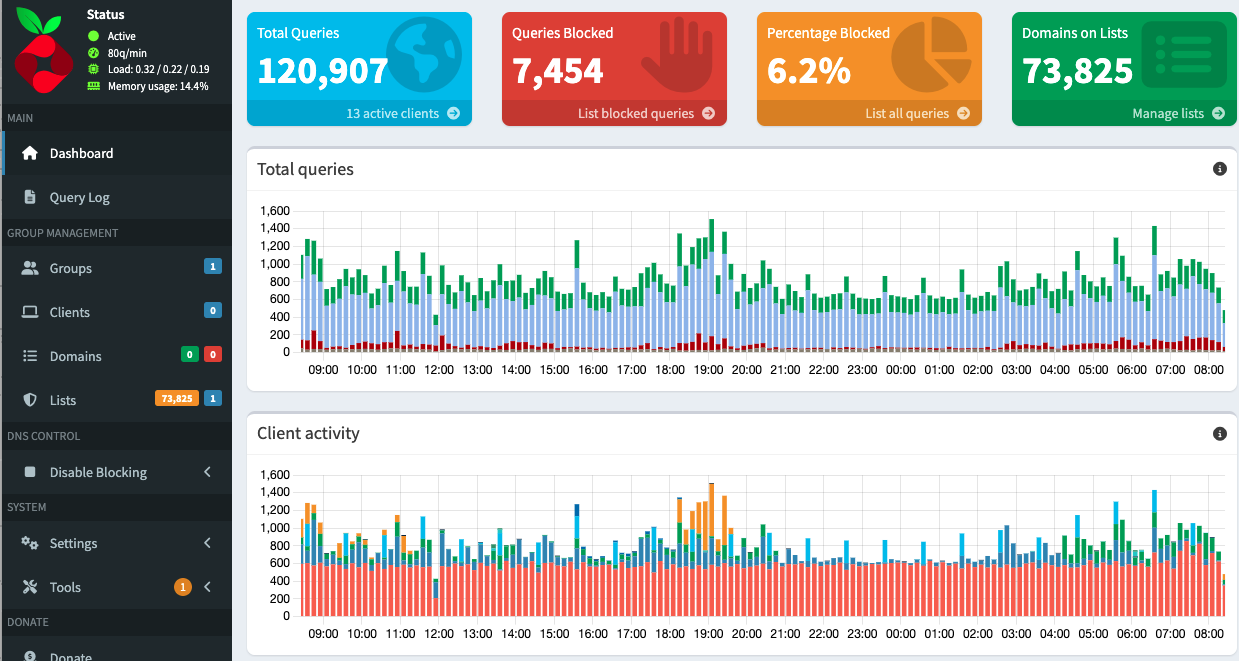
I deployed Pi-hole as my local DNS server. The main thing I needed to configure for Pi-hole was the wildcard DNS record so that any request to any subdomain of my home server’s domain (e.g. *.homeserver.com) would be routed to the reverse proxy. This is just a single line dnsmasq configuration: address=/homeserver.com/192.168.0.88. Finally, I configured my router to use the Pi-hole DNS server.
The main advertised purpose of Pi-hole is network wide Ad-blocking. Although it wasn’t my intention/use-case for deploying Pi-hole, once I had got it setup, this was really cool and shocking to observe. With just the default block list of ~70,000 domains thousands of DNS requests were being blocked as ads or trackers within a few days.
Home Assistant
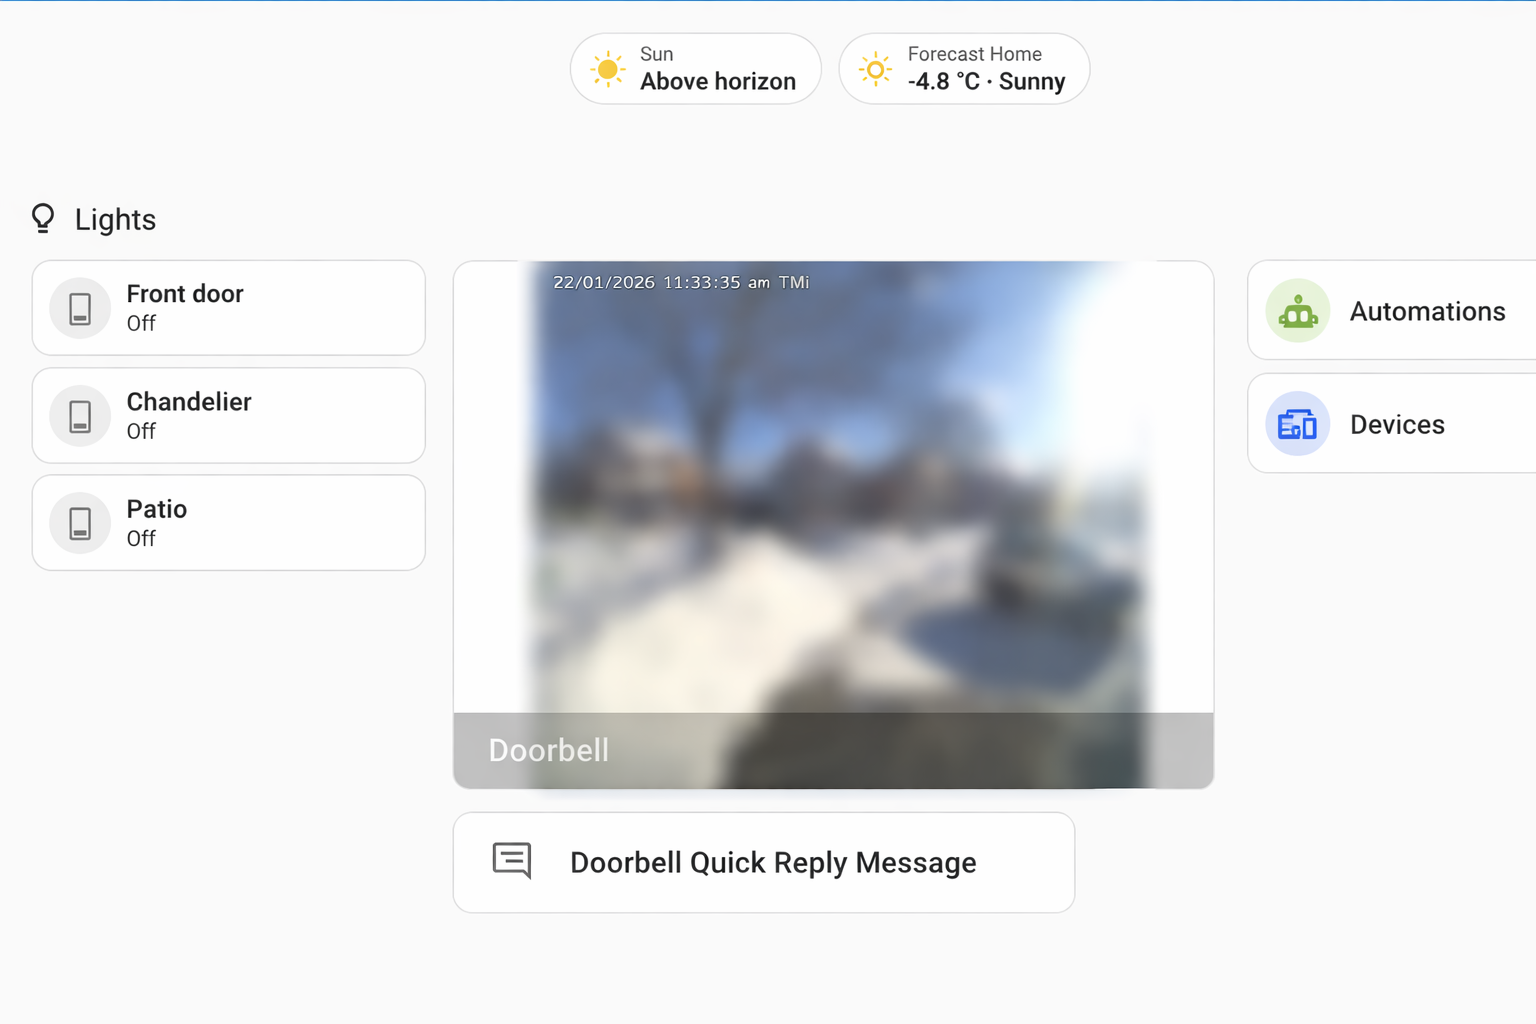
Finally, we get to solving the problem I had set out to tackle. Home Assistant is the service I deployed to automate the front door lights and setup a video feed for the doorbell. This is a smart home automation platform that is open source and puts local control and privacy first. As I had ensured that the smart light switches as-well as the video doorbell I had bought had integrations with Home Assistant, this was simple to setup. Really the only thing that took some time was learning the UI of Home Assistant to customize my dashboard or to setup automations.
The Reolink video doorbell also supports transmitting video feeds to an FTP server so I also went ahead and setup an FTP server on my home server so that on any motion detection event, a video recording would be sent and stored on the server. To prevent recordings from piling up, I created a cron job to clean up any recordings older than a month. I subsequently setup a Samba file server to provide any device on my home network a file share to easily access those video recordings.
Self-hosting and Free and Open-Source Software
One of my main realizations I had from working on the homelab is that free and open source software is simply amazing. In a world of rising enshittification, everything turning towards subscriptions models, and corporations harvesting endless amounts of data, self-hosting free and open source software feels like a step in taking back control. For almost any subscription service you may have, there’s probably a self-hosted option for it. Take a look at the awesome-selfhosted/awesome-selfhosted repository for a sense of what’s available.
Having said that, I don’t think that self-hosting is for everyone. It requires effort and some technical knowledge that would be a barrier for many people to setup their own homelab. Paid services are hands-down just going to be more convenient for most people.
Electrical work
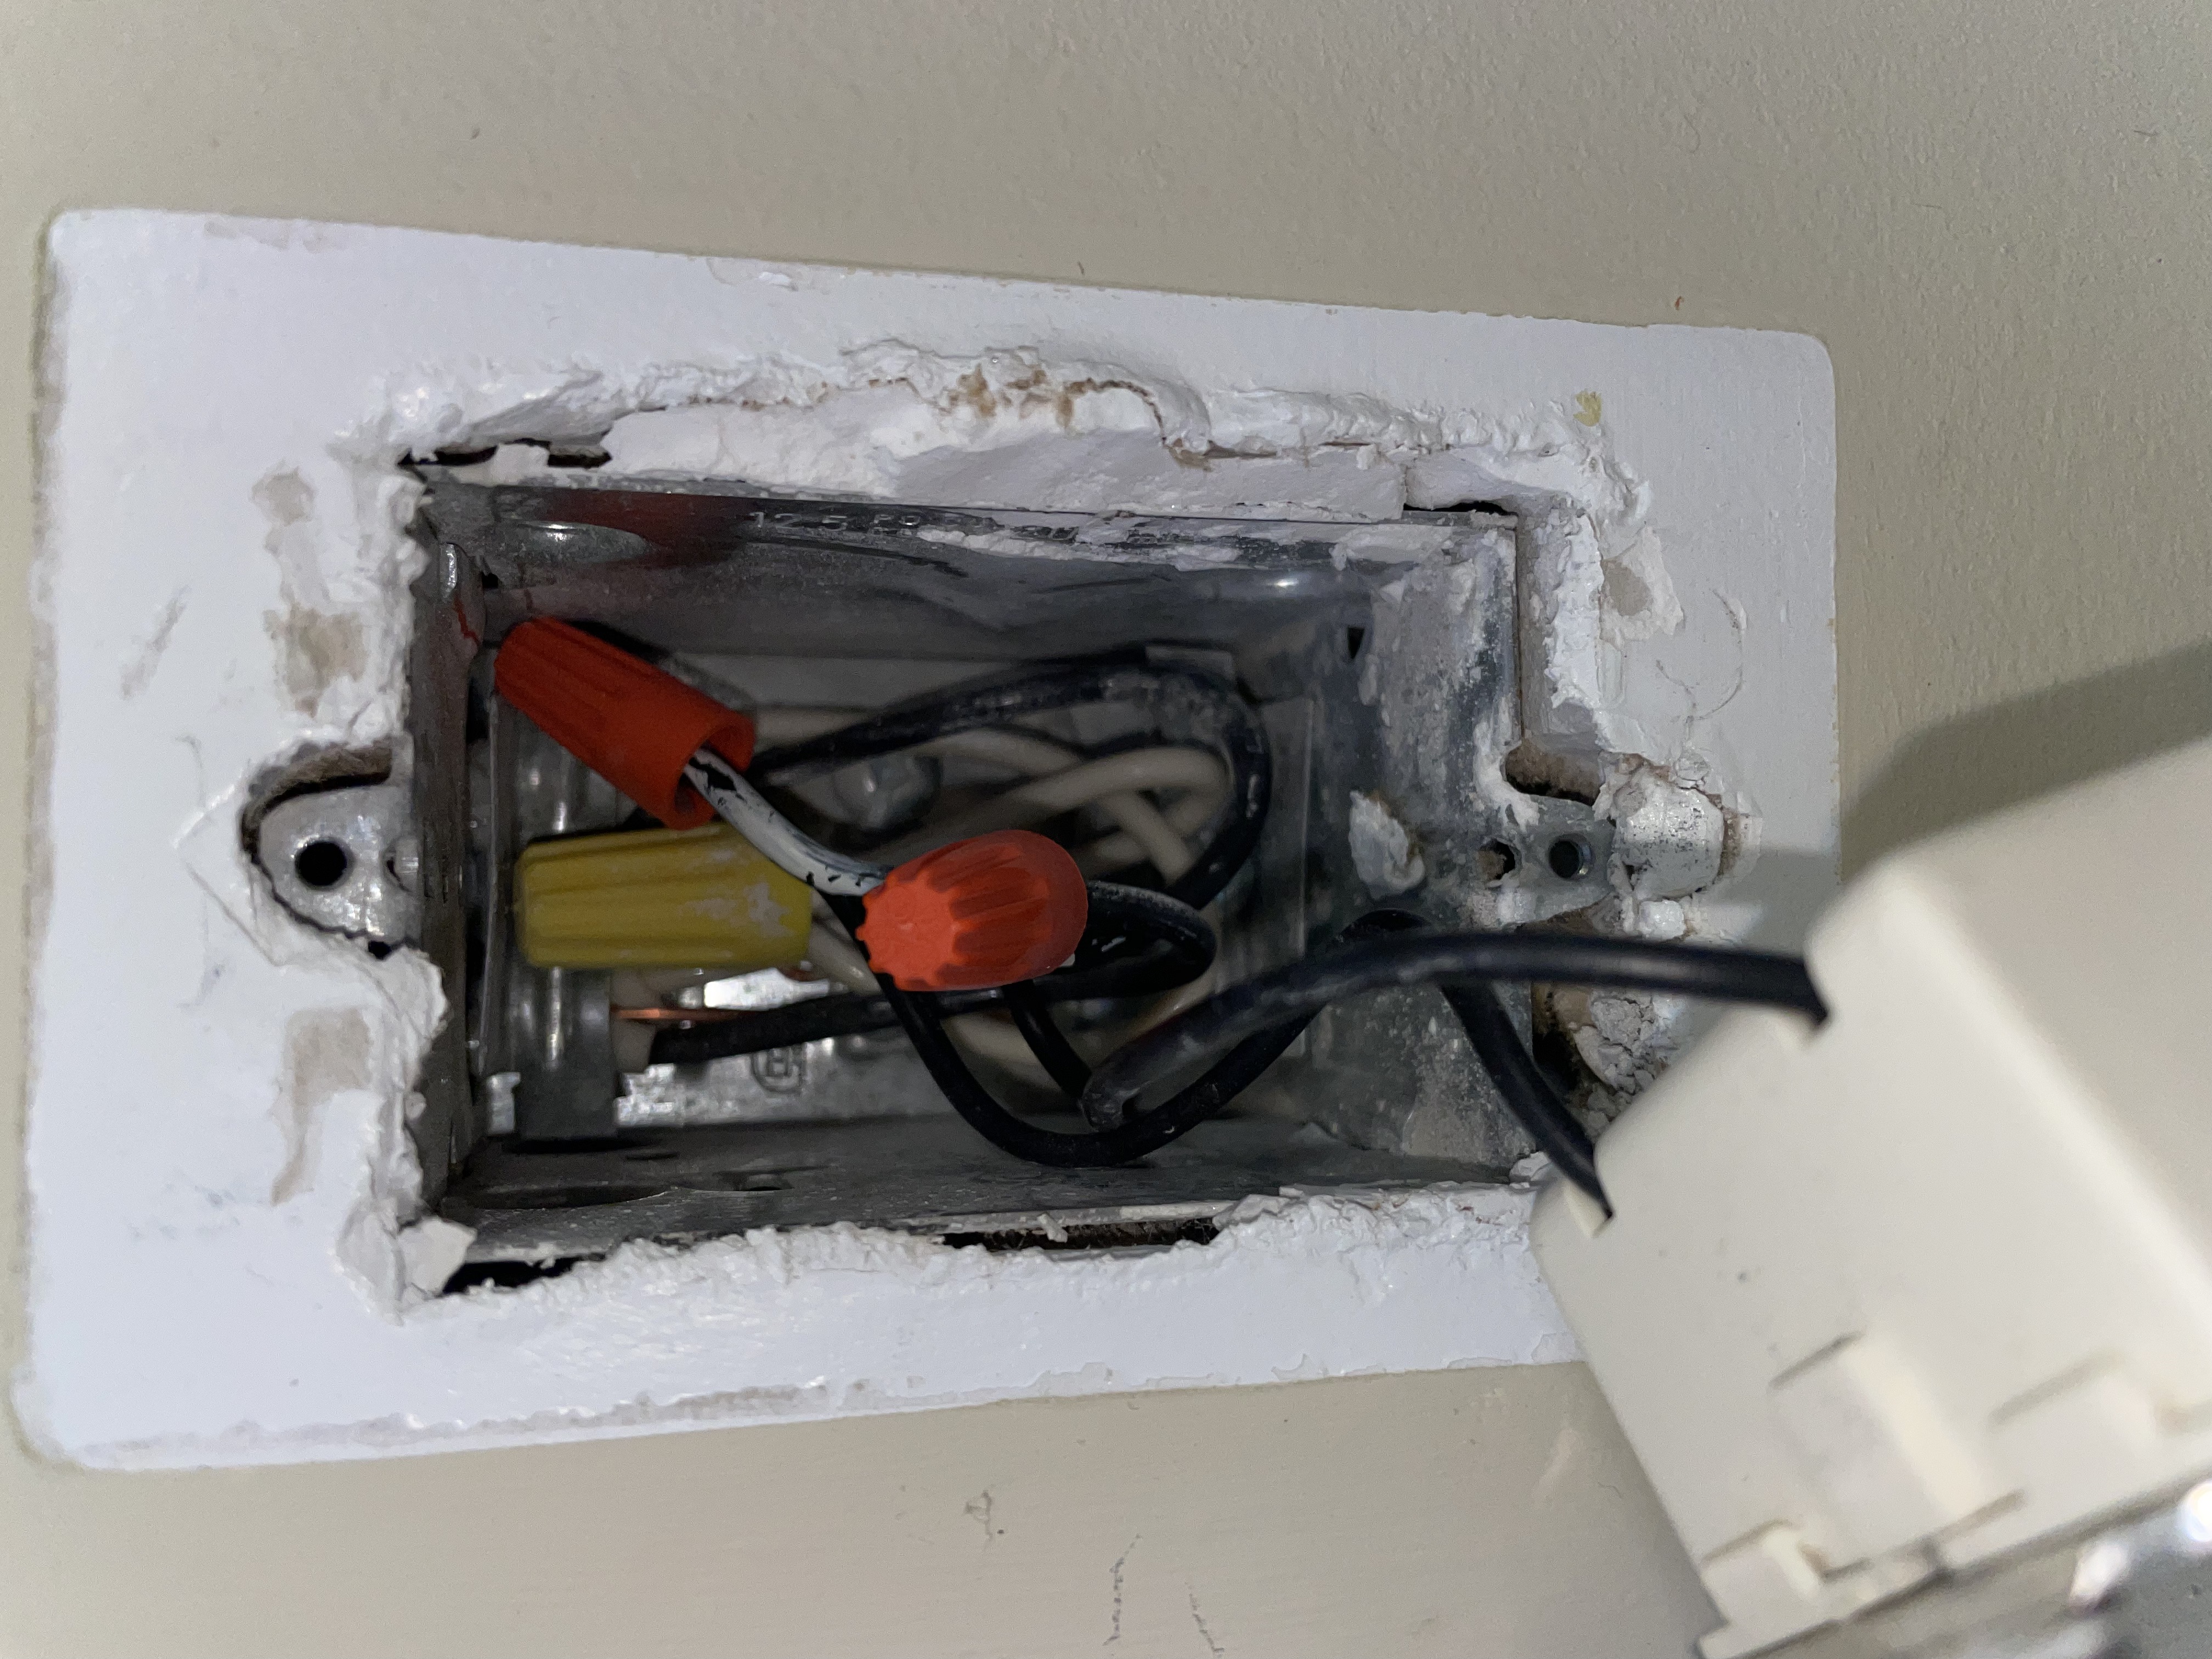
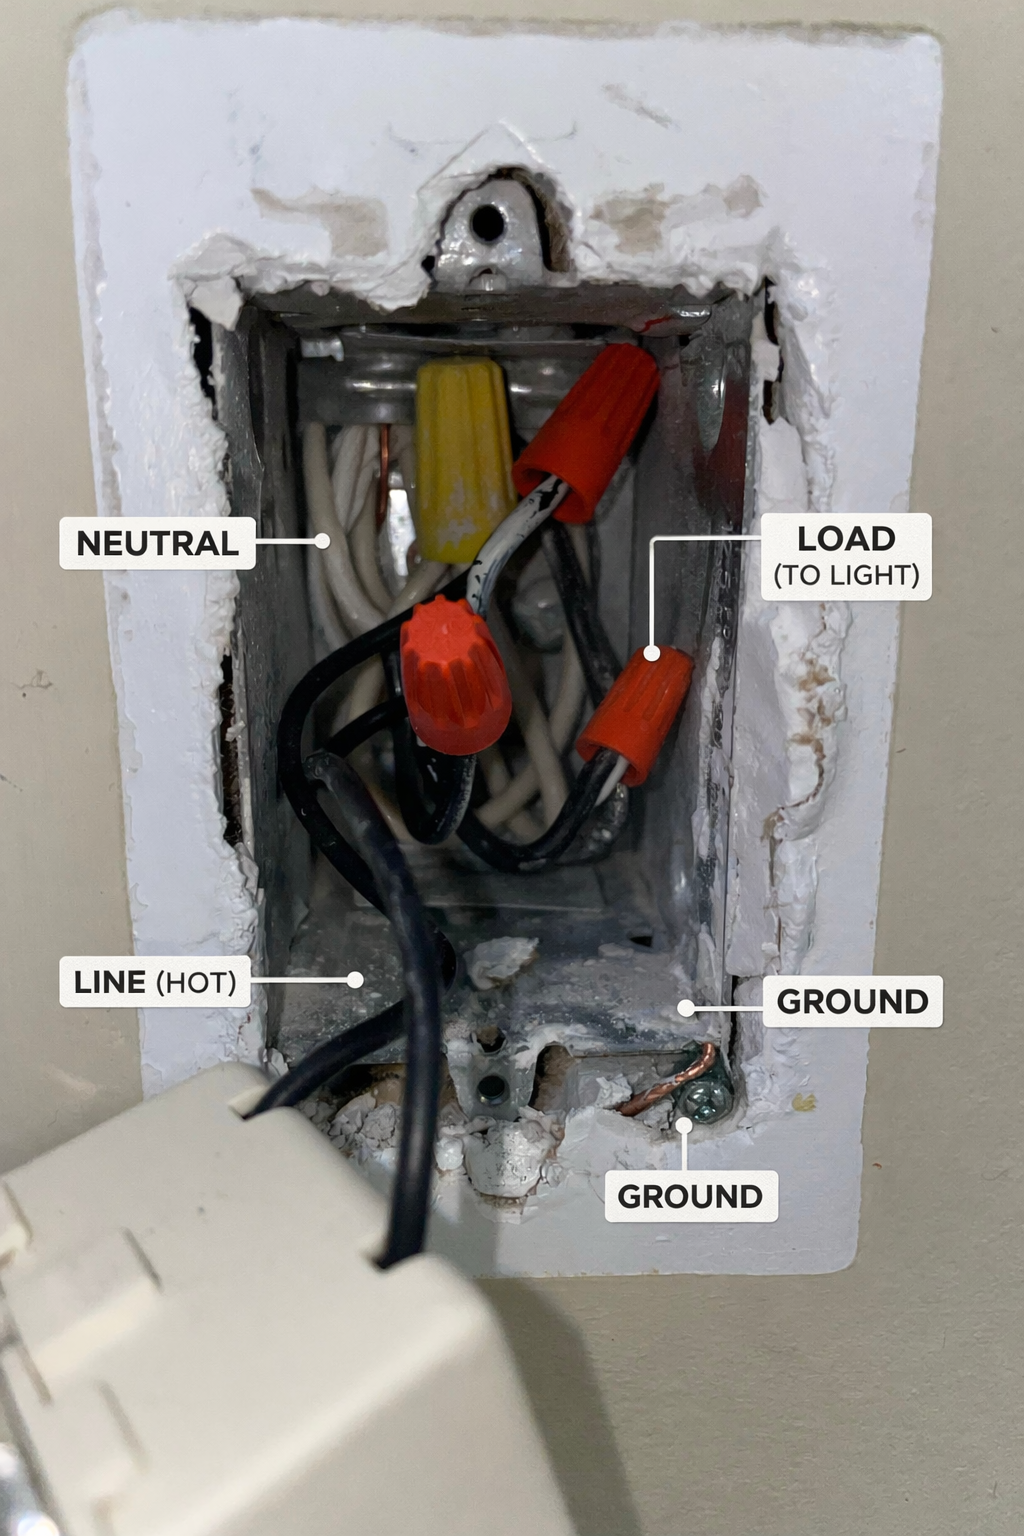
I used AI to guide me throughout this project, even the self-installation of the smart devices. I had no prior experience with electrical work so I was really banking on ChatGPT to pull through here. To keep it short, I will just say that AI has a lot of progress to make in this field. I do want to highlight one example where I asked ChatGPT to help identify the components in my junction box:
The picture I sent for labelling:
ChatGPT’s response:
Server Configuration
Here are the Docker compose files for the services I hosted.
wg-easy:
volumes:
  etc_wireguard:

services:
  wg-easy:
    environment:
      - PORT=51821
      - WG_PORT=51820
      - WG_HOST={domain.name}
    image: ghcr.io/wg-easy/wg-easy:15
    container_name: wg-easy
    networks:
      wg:
        interface_name: eth0
        gw_priority: 1
        ipv4_address: 10.42.42.42
        ipv6_address: fdcc:ad94:bacf:61a3::2a
      caddy:
        interface_name: eth1
        gw_priority: 0
    volumes:
      - etc_wireguard:/etc/wireguard
      - /lib/modules:/lib/modules:ro
    ports:
      - "51820:51820/udp"
    restart: unless-stopped
    cap_add:
      - NET_ADMIN
      - SYS_MODULE
    sysctls:
      - net.ipv4.ip_forward=1
      - net.ipv4.conf.all.src_valid_mark=1
      - net.ipv6.conf.all.disable_ipv6=0
      - net.ipv6.conf.all.forwarding=1
      - net.ipv6.conf.default.forwarding=1

networks:
  wg:
    driver: bridge
    enable_ipv6: true
    ipam:
      driver: default
      config:
        - subnet: 10.42.42.0/24
        - subnet: fdcc:ad94:bacf:61a3::/64
  caddy:
    external: true
Caddy:
services:
  caddy:
    container_name: caddy
    image: caddy:2.11-alpine
    ports:
      - '80:80/tcp'
      - '443:443/tcp'
      - '443:443/udp'
    networks:
      - caddy
    restart: unless-stopped
    volumes:
      - './Caddyfile:/etc/caddy/Caddyfile:ro'
      - './certs/server.crt:/etc/caddy/server.crt:ro'
      - './certs/server.key:/etc/caddy/server.key:ro'
      - config:/config
      - data:/data

networks:
  caddy:
    name: caddy

volumes:
  config:
  data:
Pi-hole:
services:
  pihole:
    container_name: pihole
    image: pihole/pihole:latest
    network_mode: host
    environment:
      TZ: 'America/Toronto'
      FTLCONF_webserver_port: '8080o,[::]:8080o,8443os,[::]:8443os'
      FTLCONF_misc_etc_dnsmasq_d: true
    volumes:
      - './etc-pihole:/etc/pihole'
      - './etc-dnsmasq.d:/etc/dnsmasq.d'
    cap_add:
      - SYS_NICE
    restart: unless-stopped
Home Assistant:
services:
  homeassistant:
    container_name: homeassistant
    image: "ghcr.io/home-assistant/home-assistant:stable"
    volumes:
      - /home/toot/home-server/home-assistant/config:/config
      - /etc/localtime:/etc/localtime:ro
      - /run/dbus:/run/dbus:ro
    restart: unless-stopped
    privileged: true
    network_mode: host
    environment:
      TZ: America/Toronto